The butterfly spread is a defined-risk options strategy that targets a specific price range. It pairs a capped maximum loss with a capped maximum profit, so traders use it to express a precise view on where a price will settle by expiration.
What is a butterfly spread?
A butterfly spread is a defined-risk options strategy that combines two vertical spreads — one bullish and one bearish — that share the same centre strike price.
When you map out the potential profit and loss on a graph, it creates a triangle shape that resembles a camping tent centred on a target price at expiration.
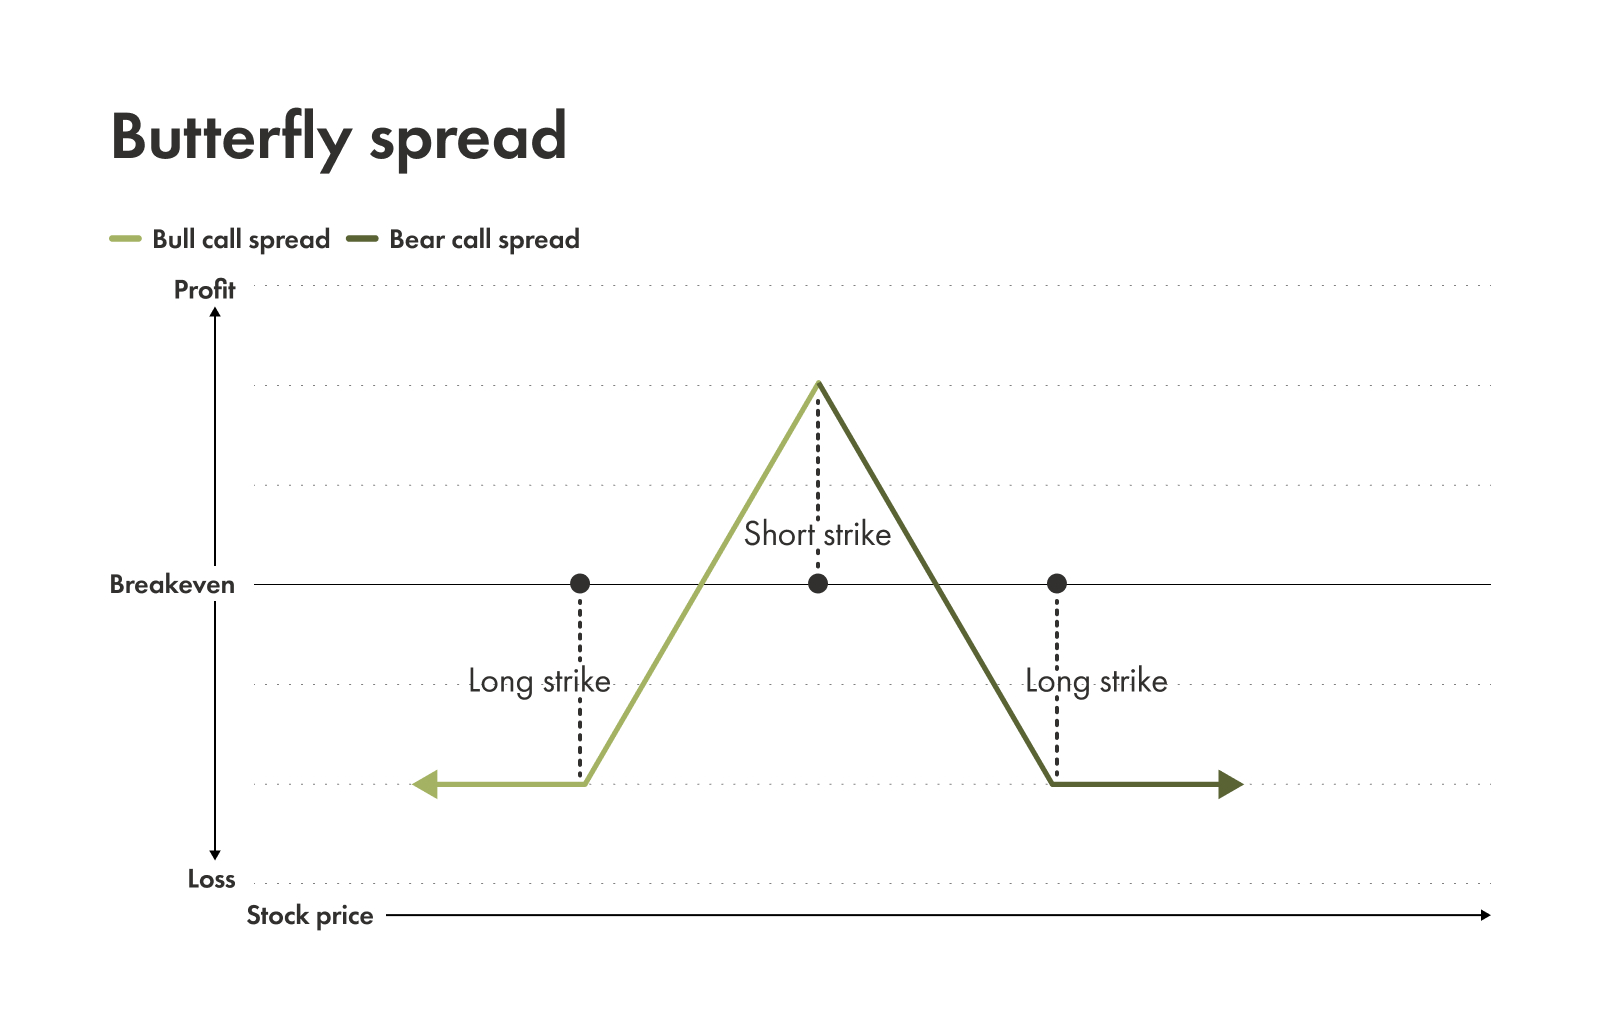
There are three main reasons why traders use it:
Defined risk: You know exactly how much you can lose the moment you enter the trade. It’s usually cheaper to take a position using spreads than buying the same quantity of the underlying asset outright.
Target pinning: It’s a spread designed for when you think a stock will land near a specific price by a specific date. It’s like a dartboard approach to trading.
Flexibility: You can build it for either a debit (you pay to enter) or a credit (you get paid to enter). You can also tilt it to be bullish, bearish, or neutral.
Within butterfly spreads, there are two main types you should know about: the standard butterfly and the broken-wing butterfly (BWB). This is how they compare:
Feature | Standard butterfly | Broken-wing butterfly |
|---|---|---|
| Structure | Symmetrical wings; Equal distance from the centre | Asymmetric wings; One side is farther out |
| Cost | Usually a net debit; You pay cash | Often a net credit; You collect cash |
| Goal | Max profit at the centre strike | Directional bias with a "safety net" |
| Risk | Balanced on both sides | Risk is tilted to one side |
How to build butterfly spreads
Let’s look at the components of the two most common variations.
Standard butterfly spread (debit)
This is the classic setup. It’s a neutral strategy, meaning you want the stock price to stay right in the middle.
The structure (1-2-1):
Buy 1 option on the lower wing.
Sell 2 options at the target price (the body).
Buy 1 option on the upper wing.
Note: All options must be the same type (all calls or all puts) and have the same expiration date. The wings must be equally distant from the body.
Example:
The long call butterfly spread
Let's say stock KIWI is trading at $100. You think it will stay exactly at $100 for the next month, so you make these trades, all with the same 30 days to expiration (DTE):
Buy 1 $95 call — This becomes the lower wing of the butterfly.
Sell 2 $100 calls — This becomes the body of the butterfly.
Buy 1 $105 call — This becomes the upper wing of the butterfly.
The options you buy (the wings) usually cost more combined than the two options you sell (the body). As a result, you pay a net debit to open this trade.
The result of this standard butterfly spread is usually a small debit or cost, which is why it’s normally called the debit butterfly spread.
While we used calls in this example, you can do this with puts. It mirrors the calls and is the same in payoff if the strikes are aligned.
Strike selection guidelines:
Wing width: Traders typically look for wings that are 2% to 10% away from the underlying asset’s price. Wider wings cost more but give you a wider "profit tent."
The pin: Place the body strike exactly where you think the price will be at expiration.
Liquidity: Target assets with high volume and a tight bid-ask spread.
Days to expiration:
21 to 45 DTE: This allows for smooth time decay (theta) and makes adjustments easier.
7 to 14 DTE: These are aggressive pin plays. They move fast, but gamma risk (rapid price sensitivity) is high.
Variations of the standard butterfly spread
Credit butterfly spread (short)
You can sell a short butterfly. This flips the graph upside down.
In this case, you want the price to explode away from the centre so you can keep the credit.
It’s less common for beginners to use a credit butterfly spread because the chance of profit is lower at the centre.
Iron butterfly spread
You may have heard of the iron butterfly. This spread uses both calls and puts to create the same tent shape.
It’s essentially a short straddle with wings for protection. The wider the wings, the wider the profit range.
In this article, we focus on the all-call or all-put variations to keep things simple.
Broken-wing butterfly
The broken-wing butterfly spread is used when you have a directional opinion.
You think the stock is going to move a little bit, but you want insurance in case it doesn't move at all, or moves too much.
The structure (1-2-1):
Buy 1 option on the lower wing.
Sell 2 options at the target price (the body).
Buy 1 option on the upper wing.
What makes a BWB different from the standard version is that you "break" one wing by moving it farther away from the body.
This usually transforms the trade from a debit spread (paying money to enter) to a credit spread (collecting money upon entering).
A BWB can be built as either calls (bearish-to-neutral) or puts (bullish-to-neutral).
Why traders choose BWBs:
Credit: You can often enter a BWB for a net credit. If the stock moves in the wrong direction, you still keep that credit.
Risk: The spread reduces or removes risk on one side while keeping it defined on the other.
Directional bias: You can be bullish or bearish while still having defined risk. If you’re off by a little, the structure offers some forgiveness.
Examples:
Bullish put BWB
Let’s say stock PLUM is trading at $100. You’re thinking it will drift up, but you’re also worried about the possibility of a crash. So you make these trades, all with the same 30 DTE:
Buy 1 $95 put — This becomes the lower wing that’s “broken” or farther away.
Sell 2 $105 puts — This becomes the body where you expect the stock to settle.
Buy 1 $110 put — This becomes the upper wing that’s not broken and is closer.
Notice the difference? The lower wing is 10 points away from the body, while the upper wing is 5 points away. That asymmetry changes the math.
Bearish call BWB
Let’s say a friend of yours thinks the opposite of you about stock PLUM. They see it trading at $100 and think the price will drift down.
But after hearing your thoughts, they’re worried that it could also shoot up in price. So your friend makes these trades, all with the same 30 DTE:
Buy 1 $105 call — This becomes the upper wing that’s “broken” or farther away.
Sell 2 $95 calls — This becomes the body where you expect the stock to settle.
Buy 1 $90 call — This becomes the lower wing that’s not broken and is closer.
Your friend is using the same asymmetrical spread, but with a bearish outlook and strikes.
Strike selection guidelines:
Place the body: Put the body strikes just beyond where you think the price might drift.
Break the wing: Move the wing out on the side you think is less likely to be tested. This is your "risk" side.
Wing width: A good starting point is to make your wings 25 to 50 points wide if you’re trading on large indexes. For another underlying asset, adjust based on its volatility.
Payoff: max profit, max loss, and breakevens
Let’s talk numbers: how do you make money with butterfly spreads?
Here’s the breakdown by type:
Standard butterfly spread (debit) payoff
Aspect | What It Means | Formula / Details |
|---|---|---|
| Max profit | You get max profit if the underlying asset closes at the body strike price. | Max profit = (wing width − net debit) × 100; Note: The ×100 assumes a standard contract multiplier. |
| Max loss | Your loss is capped. You can never lose more than what you paid to enter the trade. | Max loss = net debit paid |
| Breakeven points | You have two breakeven points: one on the left leg of the tent, and one on the right. | Lower breakeven ≈ lower strike + net debit; Upper breakeven ≈ upper strike − net debit |
| Behaviour before expiration | The profit tent’s full height is only reached at expiration. This strategy benefits from theta (time decay) and generally likes stable or falling implied volatility (IV). | The profit curve is flatter. As time passes, the curve lifts upward toward the peak (assuming the price is near the body). |
Broken-wing butterfly payoff
Metric | Explanation | Formula / Details |
|---|---|---|
| Max profit | Centred near the body, but because you often enter for a credit (or a very small debit), the max profit calculation shifts. | Max profit = (width of narrow wing + net credit) × 100, or Max profit = (width of narrow wing − net debit) × 100. Note: The ×100 assumes a standard contract multiplier. |
| Max loss | This is where you have to be careful. Because you "broke" a wing, you left a gap in your protection. If opened for a credit, the credit cushions adverse moves and can allow a small profit even if the price doesn’t hit the body. But if the price crashes through your broken wing, your loss can be larger than a standard butterfly. | Max loss = (difference in wing widths − net credit) × 100, or Max loss = (difference in wing widths + net debit) × 100. Note: The ×100 assumes a standard contract multiplier. |
| Breakeven points | If you entered with a credit, your breakeven point on the risky side is pushed farther out. This gives you a slightly higher probability of success compared to a standard vertical spread. | If you entered with a net credit: Breakeven ≈ (short strike + narrower debit spread width) + net credit. If you entered with a net debit: Lower breakeven ≈ lower strike + net debit; Upper breakeven ≈ (upper strike + width of the narrower debit spread) − net debit. |
| Behaviour before expiration | The profit tent’s full height is only reached at expiration. This strategy benefits from theta (time decay) and generally likes stable or falling IV. | The profit curve is flatter. As time passes, the curve moves toward the peak (assuming the price is near the body). |
When to use a butterfly
Not every market is a butterfly market. Here is your cheat sheet to identify when and how to spread those wings.
The setting for standard (debit) butterflies:
You expect the price to gravitate toward a specific level and stick there. Think of it as a magnet.
Some key events that can lead to this are:
Earnings aftermath: After a big move happens, stocks often stay within a limited range.
Options expiration (OpEx) pinning: Market makers often try to pin prices to strikes with large open interest at expiration. Open interest is the total number of options contracts still outstanding at a given strike.
Support/resistance: If a stock is pinned at a major moving average (for example, the 200-day), consider a butterfly centred on that range.
Stable/declining volatility: This spread is most effective during stable or mildly declining volatility. If volatility explodes, the value of your short body options might hurt you initially.
Choose a standard butterfly when:
Cost control and defined risk are key.
You have a precise target.
You’re OK with a narrower probability of max profit.
The setting for broken-wing (credit) butterflies:
You have a mild directional bias (for example, "I think the market will grind slowly higher"), but you’d hate losing money if the market stays flat.
Some key events that can lead to this are:
Drift markets: These suit a slow grind up or down without sharp reversals.
Volatility: Look out for moderate to high volatility levels.
Skew advantage: Sometimes, out-of-the-money (OTM) options are priced expensively by "skew." A BWB lets you sell those expensive options to finance the trade and reduce losses if the market goes flat.
Choose a broken-wing butterfly when:
You want a higher probability of a small to moderate gain, with a bias.
You don’t have a precise target.
You want to adjust risk levels on the spread where you’re more comfortable.
Underlying asset selection
Look for:
Liquidity: Look for high liquidity and tight bid/ask spreads, since a wide spread gives away profit. Highly liquid exchange-traded funds (ETFs) or mega-cap stocks are a good place to start.
Clarity: Seeing clear reference levels while doing technical analysis of a potential asset is a green flag. These levels are crucial for having informed outlooks, deciding on strategies, and selecting strike prices.
Consistency: Large, erratic moves that blow past both wings can wipe out a butterfly, such as a stock that swings 20% in a day.
Practical rules of thumb
Debit butterflies: Target a profit of 25% to 50% of the maximum potential amount. Exit if the value drops to 50% to 75% of your debit or a set dollar loss.
Credit BWBs: Target 30% to 60% of the initial credit. If the price breaches the body early, or reaches two to three times the initial credit risk on the broken side, get out.
Risk management and position sizing
Even though the risk in a butterfly spread is defined, you can still get hurt if you aren't careful. Here are some things to consider:
Position sizing. Butterflies have a narrow profit range and a lower probability of max profit than a simple vertical spread. Keep any single butterfly position to a small fraction (1% to 2%) of your portfolio risk.
Timing risk (the gamma trap). As you get closer to expiration (7 days or less), gamma risk explodes. This means small moves in the stock price cause large swings in your profit or loss. When this happens, consider taking profits early.
Volatility shifts. Credit BWBs are more tolerant, and a drop in IV often helps you reach profit faster. Debit butterflies prefer falling volatility. If IV spikes, the body you sold gains more value than the wings you bought, which hurts the trade temporarily.
Liquidity traps. We mentioned this before, but it bears repeating: underlying assets with tight spreads are preferable. Wide spreads can distort your entry and exit prices. If you can't get a fair price to close the trade, your theoretical profit doesn't matter.
Adjustments: how to manage butterflies when price moves
The market rarely does exactly what we want, so here’s how to fix a broken trade yourself.
Early and proactive adjustments
Rolling the body
If the stock price drifts away gradually, you can close your current butterfly and open a new one re-centred on the new stock price. It’s important to note that this will likely increase your cost basis.
Converting to a vertical
If the price runs through one side of your tent, the trade is effectively dead. You can close the "far" wing and one of the "body" shorts.
This leaves you with a simple vertical spread on the active side, potentially allowing you to salvage some value.
Unbreaking the wing (for BWBs)
If risk builds toward your broken side, buy back one of your short options and resell it further out, or buy an extra long option on the risky tail. This limits your exposure.
Defensive adjustments under stress
Add a hedge
If the price is threatening your upper breakeven, you can buy a small OTM debit spread on that side. It costs money, but it offsets the losses from the butterfly.
Time roll (calendar rescue)
This is complex but effective. You can close the losing side of the trade and reopen it in a later month.
This gives you more time for the trade to work out, though it changes the risk profile entirely.
The last resort fold
If the price is sitting way beyond your wing with only a few days left, close it. Redeploy your capital into a fresh setup.
Common mistakes to avoid
Now that you know what to do and how to pivot, here are some things to avoid when it comes to butterfly spreads:
Forcing a pin in a trending market. If the market is trending higher persistently, don't fight it with a neutral butterfly.
Oversizing into weekly expirations. Weekly options are volatile. If you put too much money into a 4-day butterfly, a single news headline could wipe out the position.
Ignoring liquidity and slippage. Paying $0.10 of slippage on a $0.50 trade is a 20% loss right away. Check the volume before you click buy.
Getting greedy. Greed can push you to hold a profitable butterfly too long, letting it revert to zero. If you reach 50% of the max profit, consider your exit.